Cloudflare tunnels with authentication
I mentioned before that I was using Traefik, what I didn’t say is that I was also using Authentik for authentication. Sometimes as forward auth (providing authentication for services that don’t support it, like Frigate), other times as a provider for apps that support it.
I’d also been messing about with Cloudflare tunnels, and yesterday I discovered that it also supports authentication.
So… I thought I wonder if I can use Cloudflare tunnels with authentication, and still route traffic through Traefik?
The answer is obviously yes or you wouldn’t be reading this. So… how?
Big picture
There’s a few pieces to this
- Configure authentication (identity) in Cloudflare Zero trust
- Create a default access group so you don’t have duplicate the access logic manually
- Create a self hosted application that uses the default access group
- Set up your Tunnel
- Route hostnames (applications) through the tunnel to Traefik
- Have Traefik handle the connection to the application
Authentication
The first thing to do is to head over to your Cloudflare dashboard, head to Zero trust, and under Settings pick Authentication.
Here we can add a new login method. As I use Authentik one option here would be to use SAML and hook into Authentik, but I took the lazy approach and used Google Workspace as my domain uses Google Workspace. There are however plenty of other options, including GitHub and OpenID.
Pick the option (or options) that suit you best and set them up. If you pick a single option then the user experience is going to be smoother, but it’s only one more click ad screen for the user.
Application configuration
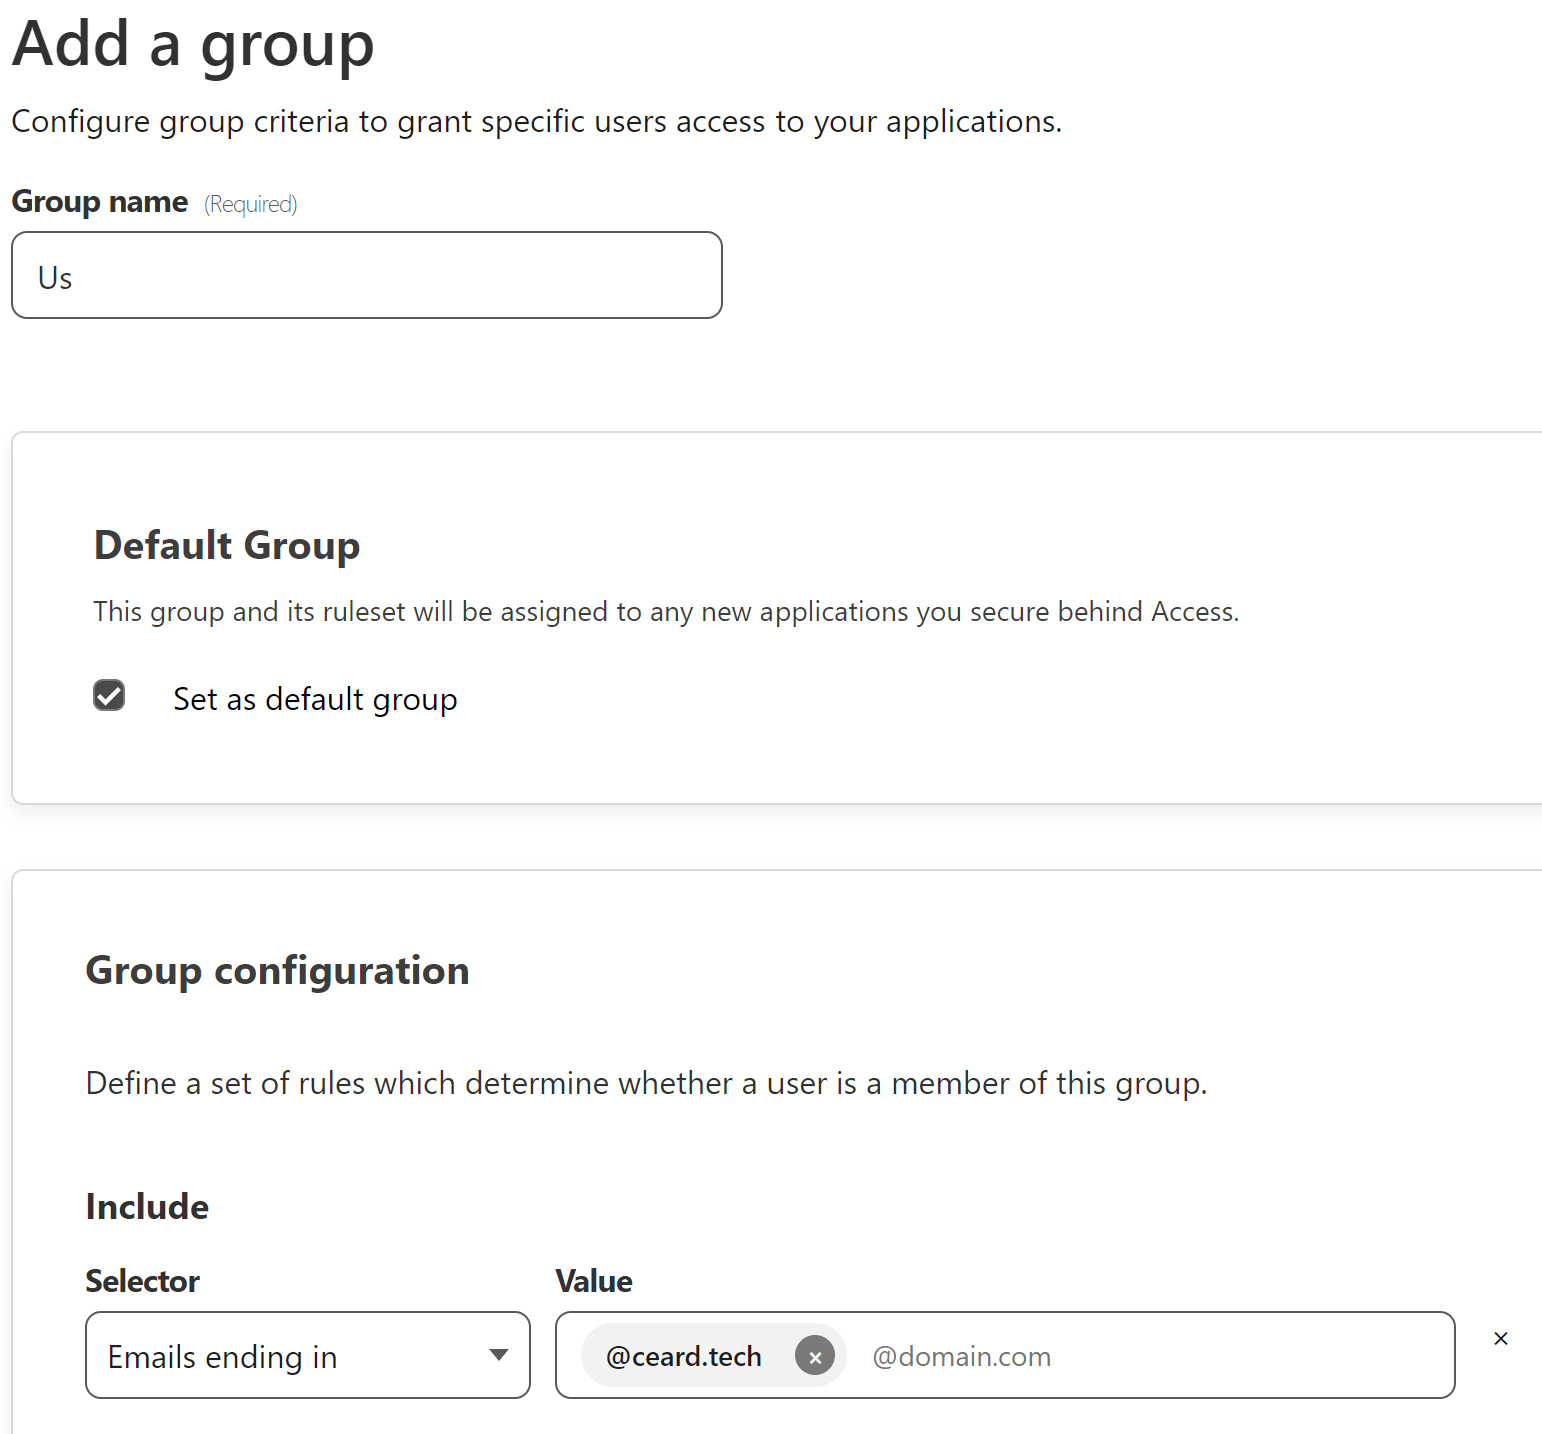
Next under the Zero trust section head to Access and then Access groups. Here you can define a group (or groups) for access. I’m creating a default group for everybody in the domain:

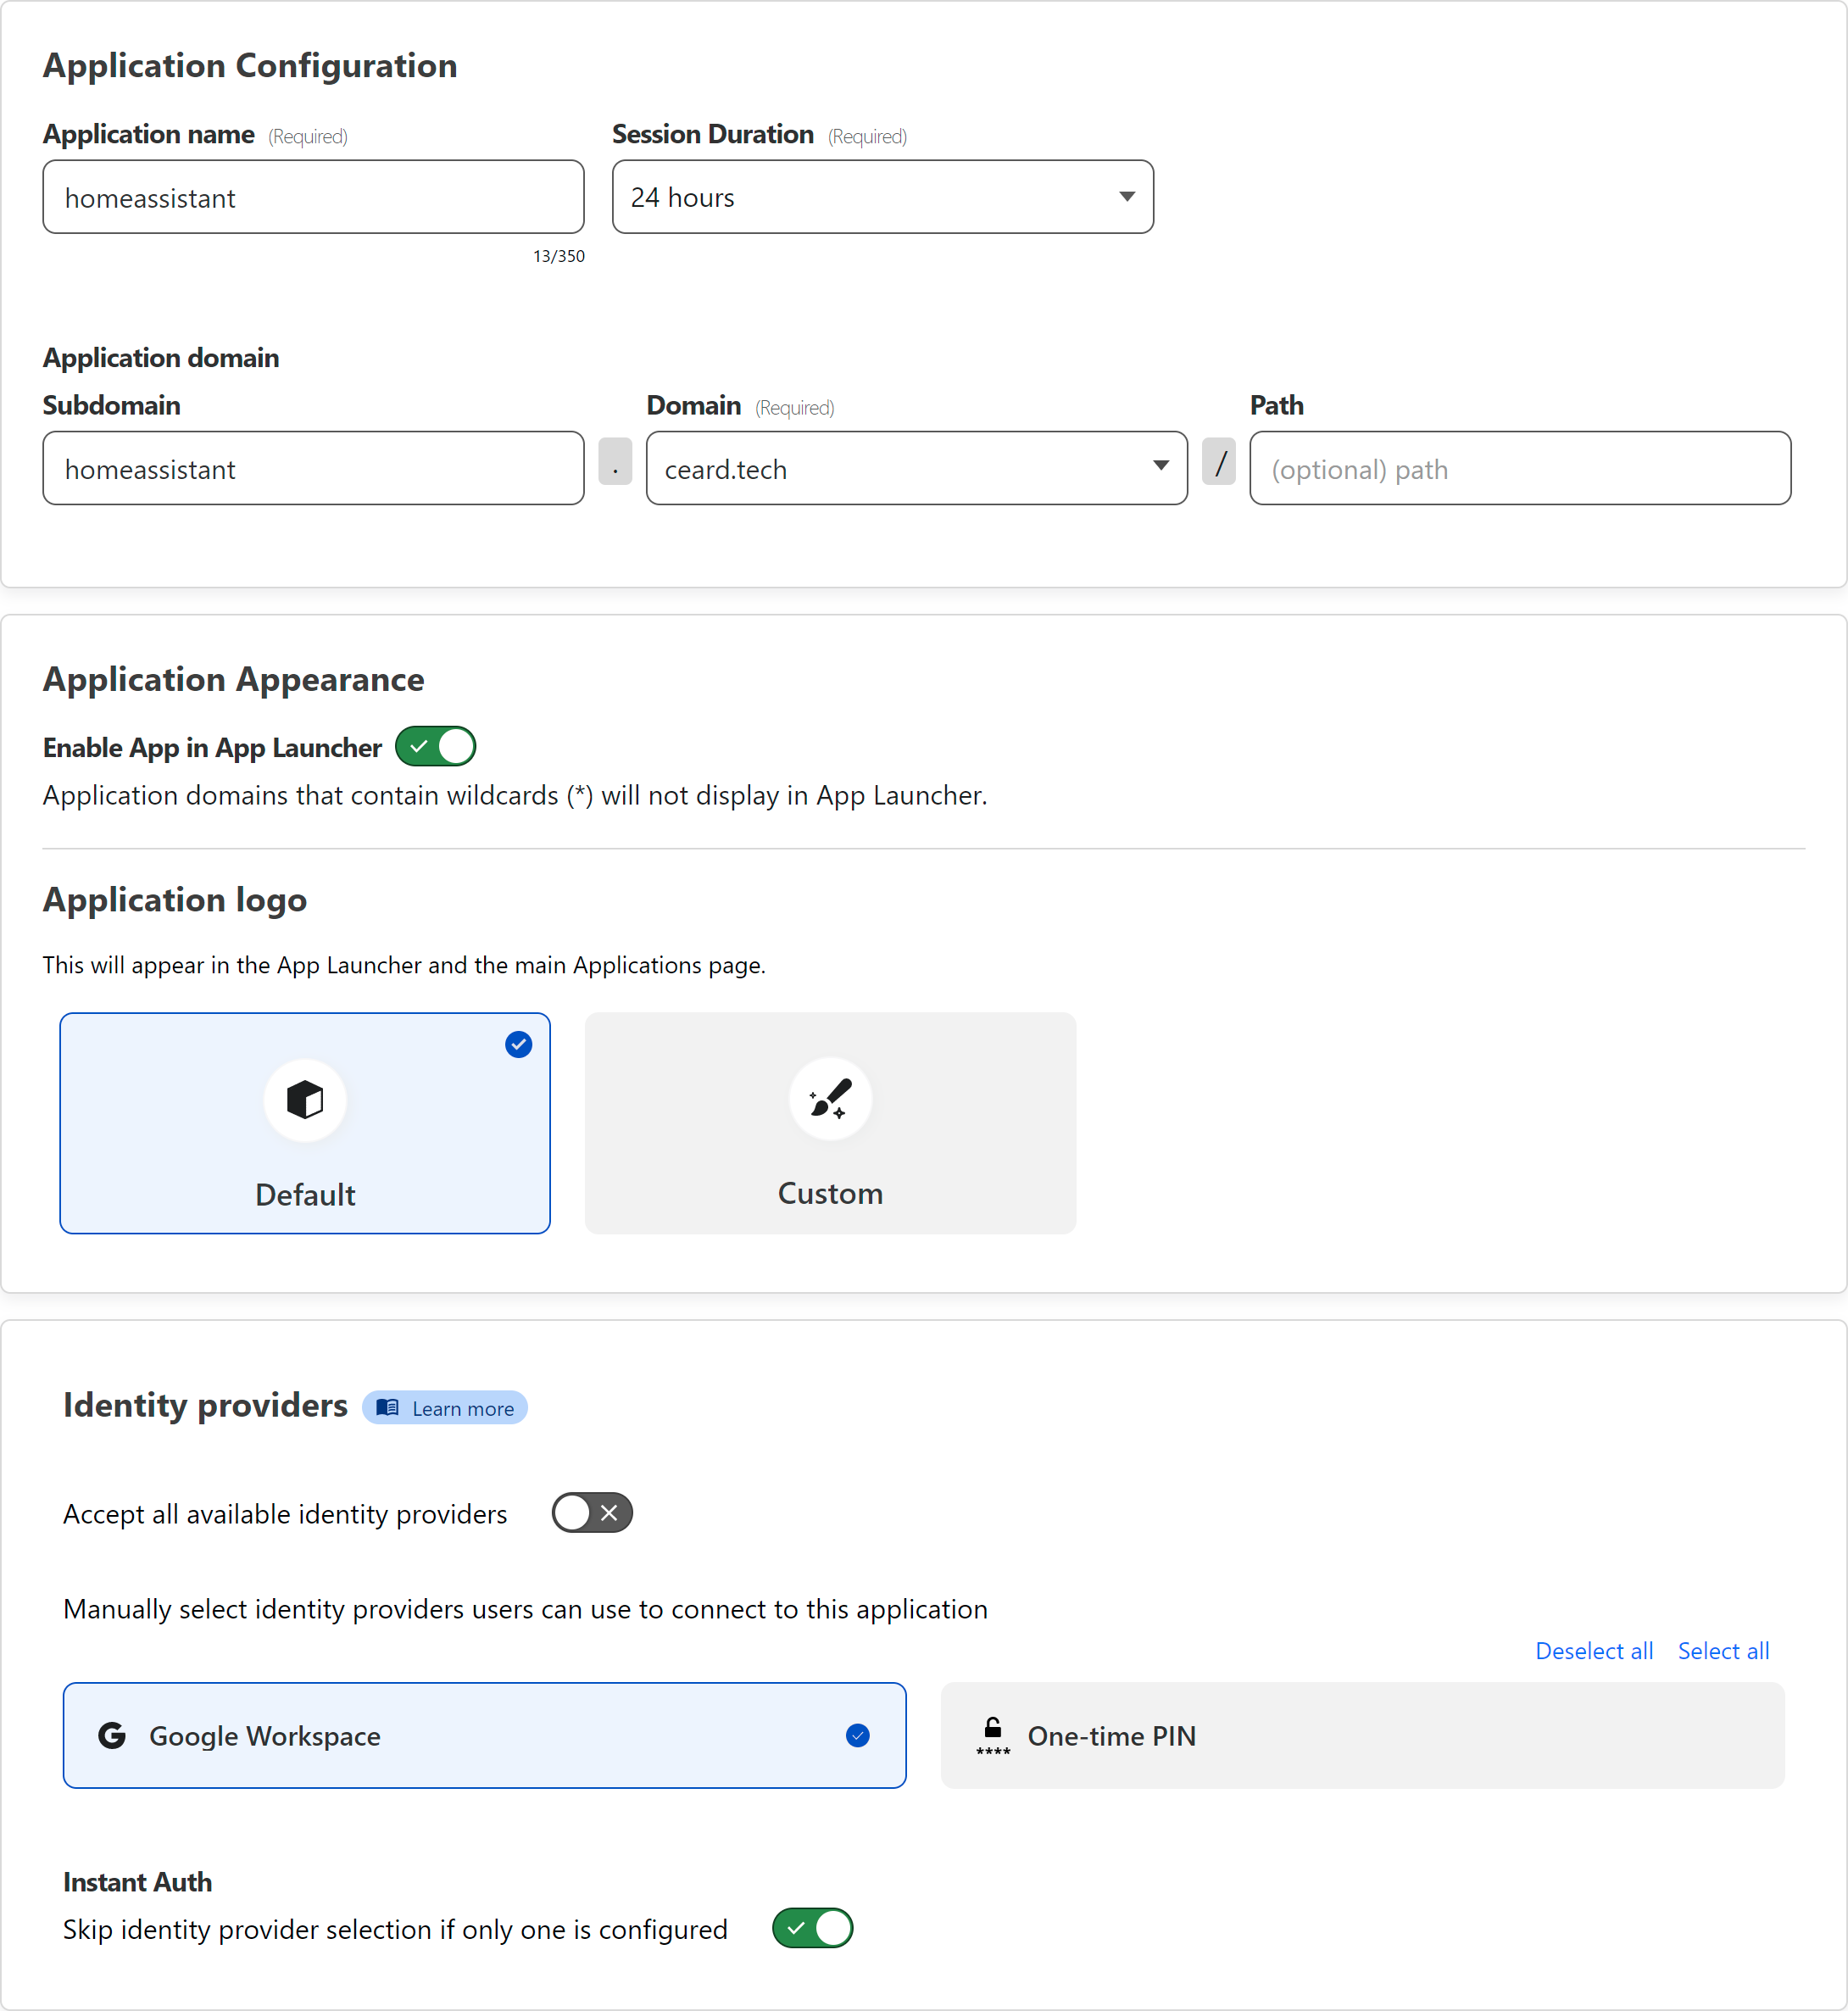
Now under Access and Applications we can create a new self hosted application.
- I keep the name and the sub-domain the same, just to make it easier to know what’s what - you’ll use this sub-domain again later for the tunnel configuration
- Session Duration I leave at the default
- I don’t use the launcher, but I’ve left it enabled in case I change my mind
- I enable only the relevant identity providers, disabling the One Time Pin option
- If you only have a single provider it makes sense to enable the skip option

Having created a default access group already the next step is easy. Give the policy a name and leave everything else at the defaults.

Setting up the tunnel
Then, still in Zero trust, go to Access and pick Tunnels.
Here you can create a tunnel, giving it a name, and then install the tunnel software. As I run everything in Docker all I had to do to install the tunnel software was add the following lines to my compose file:
  cloudflared:
    container_name: cloudflared
    image: cloudflare/cloudflared
    restart: unless-stopped
    command: tunnel run
    env_file: cloudflared.env
You can see the token you’ll need on the Install connector page, in the box for step 4:
cloudflared.exe service install ZILXRhZqTvJcirar68yyqOyfoKSUZoE9mE0oj6jFFyf6VXYzzHlDHD1deadbeefcafe6wuKRzuqHNJRcSibGdJTor1fvZa4WRRikdxKdwan1Atwi2z1Yfe2d4NIK7RXzmPApqs4PkcTu298DXvVs4W0JaFSI46y82WfkjxdrZ8Qxv5DN7ruQaxh2
(no, that’s not my token, I generated a nice long random string)
That goes in cloudflared.env:
TUNNEL_TOKEN=ZILXRhZqTvJcirar68yyqOyfoKSUZoE9mE0oj6jFFyf6VXYzzHlDHD1deadbeefcafe6wuKRzuqHNJRcSibGdJTor1fvZa4WRRikdxKdwan1Atwi2z1Yfe2d4NIK7RXzmPApqs4PkcTu298DXvVs4W0JaFSI46y82WfkjxdrZ8Qxv5DN7ruQaxh2
Now it’s just a matter of bringing the tunnel up:
docker compose pull cloudflared
docker compose up -d cloudflared
If you check your tunnel on the tunnel page you should see it now says healthy. If it doesn’t check the container logs (I do like Dozzle for that).
Next we route the traffic, using the same subdomain as for the application configuration. The tunnel’s Additional application settings is also where you can find Access where you can enable Protect with Access for the application. When you enable Protect with Access remember to pick the application name from above - if you don’t then access will be denied.

This is where Traefik comes into play.  Yes, I’ve configured the tunnel to point to Traefik, using the name of the container (as it’s in the same stack).
Two Three reasons:
- I can have Traefik do any further filtering I want
- Traefik’s middleware support (authentication, compression, etc)
- I don’t have to build out the logic of what runs where in Cloudflare, that can stay in my local network
HTTPS redirect
Before we leave Cloudflare, set up Always use HTTPS under SSL/TLS -> Edge Certificates for your domain.

Traefik
The first thing to do in Traefik is to remove any blanket HTTP -> HTTPS redirect you set up since Cloudflare is handling SSL for you now. If you don’t then you’re going to be wondering why you’re getting a too many redirects error and nothing is working.
The container labels become much simpler:
    labels:
      - "traefik.enable=true"
      - "traefik.http.routers.homeassistant.rule=Host(`homeassistant.ceard.tech`)"
      - "traefik.http.routers.homeassistant.entrypoints=web"
We’re simply enabling Traefik, telling it the hostname, and telling it to use the (insecure) entrypoint. Rebuilding the container makes the required changes:
docker compose pull homeassistant
docker compose up -d homeassistant
All done now
Now I can remotely access https://homeassistant.ceard.tech/ through Cloudflare without any port forwarding, and have it require external authentication before I can connect.
Clearly actually doing that for Home Assistant will break the mobile app, the use of any voice assistant, or any other non-UI remote access. If you’re going to need any of those then doing this is a Bad Idea™. On the other hand, for separate remote UI access (in a browser) it works well, and it’ll work for many other applications too. I plan on using this for most of the remote access I use, for things like Photoprism, Paperless-NGX, WikiJS, and maybe even Frigate now that it’s no longer against the T&Cs to stream video over a tunnel.
